Sexy Social Bookmark

About three days ago I am walking around the web and find a good tutorial about adding social bookmarks. Actually, about it, many blogger have written. But, I have never found it with something sexy. Yes, It has a short title "add is sexy", very stylist and also sexy.... :). Please see the screenshot below.


Or, you could see the demo at the end of this article.

Then, I will try to explain about how to add that in blogger.

GENERAL

0. Sign in to Blogger
1. Go to LAYOUT -- Edit HTML -- (checked expand widget templates)

CHAPTER ONE, Put in the CSS codes

1. Find (CTRL+F) this code:


]]></b:skin>


2. Afterwards, Add this CSS composition below ]]></b:skin>


<style type='text/css'>
div.sexy-bookmarks {
height:54px;
background:url('http://i43.tinypic.com/2ueii3t.png') no-repeat left bottom;
position:relative;
width:540px;
}

div.sexy-bookmarks span.sexy-rightside {
width:17px;
height:54px;
background:url('http://i43.tinypic.com/2ueii3t.png') no-repeat right bottom;
position:absolute;
right:-17px;
}

div.sexy-bookmarks ul.socials {
margin:0 !important;
padding:0 !important;
position:absolute;
bottom:0;
left:10px;
}

div.sexy-bookmarks ul.socials li {
display:inline-block !important;
float:left !important;
list-style-type:none !important;
margin:0 !important;
height:29px !important;
width:48px !important;
cursor:pointer !important;
padding:0 !important;
}

div.sexy-bookmarks ul.socials a {
display:block !important;
width:48px !important;
height:29px !important;
font-size:0 !important;
color:transparent !important;

}

.sexy-furl, .sexy-furl:hover, .sexy-digg, .sexy-digg:hover, .sexy-reddit, .sexy-reddit:hover, .sexy-stumble, .sexy-stumble:hover, .sexy-delicious, .sexy-delicious:hover, .sexy-yahoo, .sexy-yahoo:hover, .sexy-blinklist, .sexy-blinklist:hover, .sexy-technorati, .sexy-technorati:hover, .sexy-facebook, .sexy-facebook:hover, .sexy-twitter, .sexy-twitter:hover, .sexy-myspace, .sexy-myspace:hover, .sexy-mixx, .sexy-mixx:hover, .sexy-script-style, .sexy-script-style:hover, .sexy-designfloat, .sexy-designfloat:hover, .sexy-syndicate, .sexy-syndicate:hover, .sexy-email, .sexy-email:hover {
background:url('http://img509.imageshack.us/img509/3131/sexysprite.png') no-repeat !important;
}

.sexy-furl {
background-position:-300px top !important;
}
.sexy-furl:hover {
background-position:-300px bottom !important;
}
.sexy-digg {
background-position:-500px top !important;
}
.sexy-digg:hover {
background-position:-500px bottom !important;
}
.sexy-reddit {
background-position:-100px top !important;
}
.sexy-reddit:hover {
background-position:-100px bottom !important;
}
.sexy-stumble {
background-position:-50px top !important;
}
.sexy-stumble:hover {
background-position:-50px bottom !important;
}
.sexy-delicious {
background-position:left top !important;
}
.sexy-delicious:hover {
background-position:left bottom !important;
}
.sexy-yahoo {
background-position:-650px top !important;
}
.sexy-yahoo:hover {
background-position:-650px bottom !important;
}
.sexy-blinklist {
background-position:-600px top !important;
}
.sexy-blinklist:hover {
background-position:-600px bottom !important;
}
.sexy-technorati {
background-position:-700px top !important;
}
.sexy-technorati:hover {
background-position:-700px bottom !important;
}
.sexy-myspace {
background-position:-200px top !important;
}
.sexy-myspace:hover {
background-position:-200px bottom !important;
}
.sexy-twitter {
background-position:-350px top !important;
}
.sexy-twitter:hover {
background-position:-350px bottom !important;
}
.sexy-facebook {
background-position:-450px top !important;
}
.sexy-facebook:hover {
background-position:-450px bottom !important;
}
.sexy-mixx {
background-position:-250px top !important;
}
.sexy-mixx:hover {
background-position:-250px bottom !important;
}
.sexy-script-style {
background-position:-400px top !important;
}
.sexy-script-style:hover {
background-position:-400px bottom !important;
}
.sexy-designfloat {
background-position:-550px top !important;
}
.sexy-designfloat:hover {
background-position:-550px bottom !important;
}
.sexy-syndicate {
background-position:-150px top !important;
}
.sexy-syndicate:hover {
background-position:-150px bottom !important;
}
.sexy-email {
background-position:-753px top !important;
}
.sexy-email:hover {
background-position:-753px bottom !important;
}

</style>


Chapter one is done.

CHAPTER TWO : Put in the HTML code

1. After we put in the CSS, please find this code:


<data:post.body/>


Notice:


If you have more than one of <data:post.body/> , you have to find the last <data:post.body/>. Usually, this is only for blogger which use readmore. The last also means that, the sexy bookmark will appear when we enter the single page.


2. then, copy paste this HTML composition below <data:post.body/>; :


<div class='sexy-bookmarks'>
<ul class='socials'>
<li class='sexy-delicious'><a expr:href='&quot;http://del.icio.us/post?url=&quot; + data:post.url + &quot;&amp;title=&quot; + data:post.title' target='_blank'/></li>

<li class='sexy-digg'><a expr:href='&quot; http://digg.com/submit?url=&quot; + data:post.url + &quot;&amp;title=&quot; + data:post.title' target='_blank'/></li>

<li class='sexy-technorati'><a expr:href='&quot; http://technorati.com/faves?add=&quot; + data:post.url + &quot;&amp;title=&quot; + data:post.title' target='_blank'/></li>

<li class='sexy-reddit'><a expr:href='&quot; http://www.reddit.com/submit?url=&quot; + data:post.url + &quot;&amp;title=&quot; + data:post.title' target='_blank'/></li>

<li class='sexy-stumble'><a expr:href='&quot; http://www.stumbleupon.com/submit?url=&quot; + data:post.url + &quot;&amp;title=&quot; + data:post.title' target='_blank'/></li>

<li class='sexy-designfloat'><a expr:href='&quot;http://www.designfloat.com/submit.php?url=&quot; + data:post.url + &quot;&amp;title=&quot; + data:post.title' target='_blank'/></li>

<li class='sexy-facebook'><a expr:href='&quot; http://www.facebook.com/sharer.php?u=&quot; + data:post.url + &quot;&amp;title=&quot; + data:post.title' target='_blank'/></li>

<li class='sexy-twitter'><a expr:href='&quot; http://twitthis.com/twit?url=&quot; + data:post.url + &quot;&amp;title=&quot; + data:post.title' target='_blank'/></li>

<li class='sexy-furl'><a expr:href='&quot; http://www.furl.net/storeIt.jsp?u=&quot; + data:post.url + &quot;&amp;title=&quot; + data:post.title' target='_blank'/></li>

<li class='sexy-syndicate'><a href='http://feeds2.feedburner.com/YOUR-FEEDBURNER-ID' title='Subscribe to RSS'/></li>

<li class='sexy-email'><a expr:href='&quot; mailto:?subject=&quot; + data:post.url + &quot;&amp;title=&quot; + data:post.title' target='_blank'/></li>

</ul>
<span class='sexy-rightside'/></div>


3. Please see the blink blue text. You may need to edit it with your own feedburner ID.

4. After all complete.. Save Your Template. And it is done.


Credited to Naeem Nur

Kitty Park


Six days After launching BIZMAX, Web2feel.com come again with KITTY PARK. About that, here is the short description about it.

Kittypark is a 3 column, widget ready, dark wordpress theme with a pet related niche. Theme has a tabbed content section built on the sidebar. (quoted from web2feel)

This theme is perfect for newbie, as long as, he/she like KITTY / CAT .... or....
TIGER...!!! ha ha ha ha ha... that big cat are sometime making human affraid....

But, do not worry about the header, it can be customize with your own style.

OVERVIEW
Description: Original From WP Theme

Designer : Jinsona Design
URL : http://www.web2feel.com
Date : 27 March 2009

Converted to Blogger
Coded by : Daru Kurniawan Ahmadi
Nick : Cahaya Biru
URL : http://www.cahayabiru.com
Date : 27 March 2009

This Template has been tested in this following browser :
  • IE 6 (passed, but png image not shown)
  • Mozilla Firefox 2.xx (passed, and perfect)


Kitty Park Guide:
1. Changing the HEADER IMAGE


  • please go to LAYOUT -- Edit HTML -- no need to expand widget
  • find (Ctrl+F) this

http://i554.photobucket.com/albums/jj431/probluelight/KITTYPARK/top.jpg


the image size is 1000px width and 269px height. Now, you can change the image header with your own image.

Changing the Tab Navigation Title :
  • Go to LAYOUT -- Edit HTML -- no need to expand widget
  • find (CTRL+F) this :


<ul class='tabnav'>


below that code you will see like this:


<li class='pop'><a href='#recent'> RECENT </a></li>
<li class='fea'><a href='#tags'> TAGS </a></li>
<li class='rec'><a href=' #archive'> ARCHIVE </a></li>


  • after that, you could change the words RECENT, TAGS, and ARCHIVE
  • Then, Save Your Template


3. Add the content of Menu (click here)

BIZMAX GUIDE: Adsense Size and Color Setting

SCARLETT, BISMAX and MONEZINE download links are READY


For Top header

Go to adsense.com

set your adsense size to 468 x 60

set the color code with this
Border
#
Background
#
Text
#
URL
#

then get your code.

After getting your code
Go to LAYOUT -- Edit HTML (no need to expand widget)

1. find this


<div class='headbanner'>


2. below that code you will see


<div class='headbanner'>
<!-- Ad_code_section_starts -->

<!-- Ad_code_section_ends -->
</div>


change the blue text with your own adsense code.
Save it. (ads will appear in next 10 minutes (google standard))

For Ads along with main post
set your adsense code to 468 x 60
set your ads color with this
Border
#
Background
#
Text
#
URL
#

then get your code
convert to entities

After that
Go to your LAYOUT -- Edit HTML
find this


<div class='ad1'>


below you will see this:


<div class='ad1'>

</div>


change the blue text with your own ads
(don't forget to convert the ads code before putting it into template)


Right Column Ads
set your ads size to 300 x 250
set your ads color with this:
Border
#
Background
#
Text
#
URL
#

get your code and convert it to entities

After that, go to LAYOUT -- Edit HTML
find this


<div class='tagcloud'>


below that code you will see like this :


<div class='tagcloud'>

</div>


change the blue texts with your own ads code.
(don't forget to convert the ads code to entities before putting it into template)

Sorry Part II (Short And Clear)

SCARLETT, BISMAX and MONEZINE download links are READY


After so many comments, suggestions, and advice in this title Part I, I have been thinking for a while. There has been war in my mind, great struggle, for several days, thausands of minutes. One said "Business/commercial" and the other said "Free". Screaming inside my soul "Free...." and the other side said "Money...money..."

While my condition as a blogger who was confusing, I look after my guidance book and read about happiness...

what is the meaning about happiness...??
And come another questions in my mind. Is money the only thing to get happiness?
I walk around to think, reading again... then reading again...

Then, I found one of postulates from my guidance book. It said,
When you help other people, then they will help you. Love them, and they will love you. Bring to them the best, then they will respect.

Eventhough life is pain, no need to worry about money. The Invisible hand will provide what you need, and not what you want. The invisible hand will give extra to the higher level.

Maybe you will say that I am stupid, dumb, or anything like that...because not making my conversion for commercial interest...

Let's see next ... we will know who is clever and dumber....

In the same time, I also want to introduce my new domain name. I change it from www.cahayabiru-sphere.blogspot.com to www.cahayabiru.com. Cahayabiru.com will come with love. You will see premium template setting that shared for free in this blog.

Because of changing domain, I really appreciate if you don't mind to change credit footer link http://cahayabiru-sphere.blogspot.com to http://www.cahayabiru.com

Again, Cahayabiru.com will come with love.


Thanks for visiting and using my works. Also, Thank you for your support, advice, and suggestions.


BOOM ... BOOM ... BOOM ...
PREMIUM SETTING STANDARD FOR FREE....
http://www.cahayabiru.com

Bizmax Glider


Short Description:

Content Glider is featured contents on your page, by turning ordinary pieces of HTML content into an interactive "glide in" slideshow. In BIZMAX, The Glider is exactly below the category menu and above the mainpost. It has 630px width, short text teaser with read-more button. Please see the screenshot below.


<div class="glidecontent">

<h2><a href="POST-LINK-LOCATION" title="HOVER-TITLE">POST-TITLE </a></h2>
<p>TEASER TEXT OR SHORT PARAGRAPH
&nbsp;<a href='YOUR-POST-LINK-ADDRESS'>Read More &rarr;</a></p></div>


Change the word:
  • POST-LINK-LOCATION with your featured article link address
  • HOVER TITLE with your short description. TITLE is hover, that will show when your mouse put over the link.
  • TEASER TEXT OR SHORT PARAGRAPH with your own
  • POST-TITLE with your article title.


You could edit this in wordprocessor, notepad or alike.

AFTER MAKING YOUR OWN CUSTOMIZATION
  • Go to LAYOUT -- ADD PAGE ELEMENT
  • you will see Glider gadget
  • press edit, then paste your own customization into the box
  • save ...

Example content of content glider :


<div class="glidecontent">

<h2><a href="#" title="Righteous Kill">Righteous Kill</a></h2>
<p>Lorem ipsum dolor sit amet, consectetuer adipiscing elit. Quisque sed felis. Aliquam sit amet felis. Mauris semper, velit semper laoreet dictum, quam diam dictum urna, nec placerat elit nisl in quam. Etiam augue pede, molestie eget, rhoncus at, convallis ut, eros. Aliquam pharetra. Nulla in tellus eget odio sagittis blandit. Maecenas at nisl. Nullam lorem mi, eleifend a, fringilla vel, semper at, ligula. Mauris eu wisi. Ut ante dui, aliquet nec, congue non, accumsan sit amet, lectus. Mauris et mauris. Duis sed massa id mauris pretium venenatis. Suspendisse cursus velit vel ligula. Mauris elit. Donec neque. Phasellus nec sapien quis pede facilisis suscipit. Aenean quis risus sit amet eros volutpat ullamcorper. Ut a mi. Etiam nulla. Mauris interdum.
&nbsp;<a href="#">Read More &rarr;</a></p></div>
<div class="glidecontent">

<h2><a href="" title="50 cents">50 cents</a></h2>
<p>Lorem ipsum dolor sit amet, consectetuer adipiscing elit. Quisque sed felis. Aliquam sit amet felis. Mauris semper, velit semper laoreet dictum, quam diam dictum urna, nec placerat elit nisl in quam. Etiam augue pede, molestie eget, rhoncus at, convallis ut, eros. Aliquam pharetra. Nulla in tellus eget odio sagittis blandit. Maecenas at nisl. Nullam lorem mi, eleifend a, fringilla vel, semper at, ligula. Mauris eu wisi. Ut ante dui, aliquet nec, congue non, accumsan sit amet, lectus. Mauris et mauris. Duis sed massa id mauris pretium venenatis. Suspendisse cursus velit vel ligula. Mauris elit. Donec neque. Phasellus nec sapien quis pede facilisis suscipit. Aenean quis risus sit amet eros volutpat ullamcorper. Ut a mi. Etiam nulla. Mauris interdum.
&nbsp;<a href="#">Read More &rarr;</a></p></div>
<div class="glidecontent">

<h2><a href="#" title="Remedy Games">Remedy Games</a></h2>

<p>Lorem ipsum dolor sit amet, consectetuer adipiscing elit. Quisque sed felis. Aliquam sit amet felis. Mauris semper, velit semper laoreet dictum, quam diam dictum urna, nec placerat elit nisl in quam. Etiam augue pede, molestie eget, rhoncus at, convallis ut, eros. Aliquam pharetra. Nulla in tellus eget odio sagittis blandit. Maecenas at nisl. Nullam lorem mi, eleifend a, fringilla vel, semper at, ligula. Mauris eu wisi. Ut ante dui, aliquet nec, congue non, accumsan sit amet, lectus. Mauris et mauris. Duis sed massa id mauris pretium venenatis. Suspendisse cursus velit vel ligula. Mauris elit. Donec neque. Phasellus nec sapien quis pede facilisis suscipit. Aenean quis risus sit amet eros volutpat ullamcorper. Ut a mi. Etiam nulla. Mauris interdum.
&nbsp;<a href="">Read More &rarr;</a></p></div>


Have a nive try....

BIZMAX


This day I would like to introduce BIZMAX blogger template.

OVERVIEW
Description:
Original from WP THEME

Author and Designer
Designer : Jinsona Design
URL : www.Web2feel.com
Date : 21 March 2009

Blogger XML coded / Converter
Converter : Cahaya Biru
URL : http://www.cahayabiru.com
Date : 25 March 2009

Features of the template:
1. Premium theme layout.
2. Multi-level dropdown javascript navigation menu.
3. Featured sliding posts.
4. Site wide customizable 125 x 125 custom banner ads.
5. Adsense Three adsense units on any given page on the theme.
  • On the header ( 468x 60)
  • Along with the post ( 468x 60)
  • On sidebar ( 300 x 250)
6. Tabbed content area * Featured Video * Flash tag cloud * Popular Posts
7. Two widgetized sidebars
8. Optional Currency rate widget

BIZMAX GUIDE

1. Change The BIZMAX Header
The Header is using two images, dollar picture and BIZMAX text. To change those, please read the steps below:
  • Go to LAYOUT -- EDIT HTML -- (No need to expand widget)
find this image address:

http://3.bp.blogspot.com/_xfdD6S9fOk4/Sdv51H2pZGI/AAAAAAAAAww/nRy4JSQ-hTI/s1600/logo.gif


This is for BIZMAX words.

  • after that, find this image address:

http://4.bp.blogspot.com/_xfdD6S9fOk4/Sdv5l2XnheI/AAAAAAAAAwA/WGhQSzntBlM/s1600/dollar.gif


and this is for dollar image.

2. Change the Tab Navigation Title:
  • Go to LAYOUT -- EDIT HTML -- (No need to Expand widget)
find (CTRL+F) this :

<li class='pop'><a href='#video'> RECENT</a></li>


  • Below that code you will see like this:

<li class='pop'><a href='#video'> RECENT</a></li>
<li class='fea'><a href='#tags'> LABEL</a></li>
<li class='rec'><a href=' #popular'> Video </a></li>


  • After that, You can Change the word RECENT, LABEL, and VIDEO with your own words.

  • Save your template.


3. Cat Menu (click here)

4. Content Glider (click here)

5. Adsense Setting (general guide, click here)

6. Adsense Size and color Setting, click here)


Customize The content Of Menu

SCARLETT, BISMAX and MONEZINE download links are READY


There are 2 kind of Menu.
  1. Fox Menu
  2. Category Menu

I set the Menu in ADD PAGE ELEMENT. I do hope you enjoy with this setting.
The difference is that, when you want to add menu link, you do not need to go to EDIT HTML anymore. Now, you go to add page element.

MONEZINE, SCARLETT, EPSILON, and BIZMAX use both of them.
But, for Kitty Park, it is only use just Cat Menu. (Kitty Park user can go directly to the Catmenu topics.

Below, I will explain how to add the content of menu.

FOR FOX MENU

It is aesy to fill the content of FOX MENU. below is the HTML for fox menu.

<li><a href="YOUR-LINK-LOCATION-HERE">About Me</a></li>
<li><a href="YOUR-LINK-LOCATION-HERE">Contact</a></li>
<li><a href="YOUR-LINK-LOCATION-HERE">YOUR TITLE</a></li>
<!-- You could add more list by copy-paste the green text-->

Change the word:
  • YOUR LINK ADDRESS with your own address
  • YOUR-TITLE with your own title


You could edit this in word processor, notepad or alike.


FOR CAT MENU
HOW TO MAKE PARENT And CHILDREN MENU

Parent and children is links which refer to the specific page of your blog.
Parent menu is like a group menu which has sub-groups, While children is a link which directed to your specific page.

HTML Composition

<li><a href='PARENT-LINK-ADDRESS'>PARENT TITLE</a>
<ul class='children'>
<li><a href='CHILDREN-LINK-ADDRESS'>CHILDREN TITLE</a></li>
<!-- You could add more list by copy-paste the green text-->
</ul>
</li>

Change the word:
  • PARENT-LINK-ADDRESS with your own label/category address
  • PARENT TITLE with your title
  • CHILDREN-LINK-ADDRESS with your specifif post address
  • CHILDREN TITLE with your sub menu title
You could edit this in word processor, notepad or alike.

If you want to add more sub menu, just copy-paste the green text. Then, edit the link address, and title.

HOW TO MAKE SUB-PARENT MENU

What is sub parent menu? Actually, I am out of words to explain its definition.
I just give you the screen shot of my blog and hope you will get your own definition.
Every sub parent have children which directed to the specific page.

Below is the HTML Structures

<li><a href='PARENT-LINK-ADDRESS'>PARENT TITLE</a>
<ul class='children'>
<li><a href='CHILDREN-LINK-ADDRESS'>CHILDREN TITLE</a></li>

<li><a href='SUB-PARENT-LINK-ADDRESS'>SUB PARENT TITLE</a>
<ul class='children'>
<li><a href='CHILDREN-LINK-ADDRESS'>CHILDREN TITLE</a></li>
<!-- You could add more list by copy-paste the green text in here -->
</ul>
</li>
<!-- You could add more list by copy-paste here -->

<li><a href='SUB-PARENT-LINK-ADDRESS'>SUB PARENT TITLE</a>
<ul class='children'>
<li><a href='CHILDREN-LINK-ADDRESS'>CHILDREN TITLE</a></li>
<!-- You could add more list by copy-paste the green text-->
</ul>
</li>
<!-- You could add more list by copy-paste in here -->

</ul>
</li>

Change the word:
  • PARENT-LINK-ADDRESS with your own label/category address
  • SUB-PARENT-LINK-ADDRESS with your sub label/category
  • PARENT TITLE with your title
  • CHILDREN-LINK-ADDRESS with your specifif post address
  • CHILDREN TITLE with your sub menu title
You could edit this in word processor, notepad or alike.

AFTER YOU MAKE YOUR OWN CHANGING.

1. Go to Add Page Element
2. You will see Category Menu Widget
3. Press Edit, Paste your changing into the box


4. Save it.

Installing Adsense Code


MONEZINE GUIDE

CUSTOMIZE THE ADS SIZE AND COLOR CODE

For Head Banner:
set ads size to 728x90 :

For ads inside the single post:

set to 336x280 size

Border
#
Background
#
Text
#
URL
#


For Content Glider

Set to size to 468 x 80

Border
#
Background
#
Text
#
URL
#


PUT IN YOUR ADSENSE INTO THE TEMPLATE

Before you put your ads code to template, you need to convert it into entities. Below is the tool to convert HTML ads code to entities. you can use it.


After you convert HTML ads code to entities,
Go to LAYOUT Edit HTML (expand widget)

For ads inside single post,
1. find (CTRL+F) this tags :

<div class='headbanner'>
<!-- Ad_code_section_starts -->

below that code you will see like this:


<div class='headbanner'>
<!-- Ad_code_section_starts -->

YOUR ADSENSE CODE HERE


<!-- Ad_code_section_ends -->
</div>


2.Replace the adsense in blue text with yours


Put in your adsense inside single post
1. Find (CTRL+F) this tags:


<div class='ad1'>
<!-- Ad_code_section_starts -->


below the code above, you will see this,


<div class='ad1'>
<!-- Ad_code_section_starts -->

YOUR ADSENSE CODE HERE

<!-- Ad_code_section_ends -->
</div>


2. Replace the blue texts with your own ads

That's all...

GET YOUR ADSENSE CODE

SCARLETT, BIZMAX and MONEZINE download links are READY


Epsilon, Scarlett, and Monezine Templates is built in with adsense ready. This writing try to explain about how to get the adsense code. Also, with this, I hope that you will make more earn by getting some bucks from adsense.

STEP BY STEP ABOUT HOW TO GET ADSENSE CODE

1. Sign in to your adsense account
2. After sign in, you'll see a the reports from adsense. This report is for member that have adsense account before. If you are newbie, the report still showed. But you did not have any earn yet.
3. Click the Adsense Setup tab.
4. Choose adsense for content5. After you choose adsense for content, Choose Ad Unit. And click the continue button below. 6. Customize your ads size and color. After you're done, Then click the continue button

7. Now, you are in ad channel. Click Continue Button again

8. Giving a name for your ads. Then, click "Submit and get code" button9. Copy the adsense code... Now, you get the code. :)
10. If you need to convert that code to Entities. you could use this tool for short.


Monezine GLIDER

SCARLETT, BISMAX and MONEZINE download links are READY


Short Description:
Content Glider is featured contents on your page, by turning ordinary pieces of HTML content into an interactive "glide in" slideshow. In Monezine, The Glider is exactly below the menu and above the mainpost. It has 960px width with Thumbnails picture (450x180), short text teaser, read-more button, and 468x80 adsense place. Please see the screenshot below.


HOW TO FILL THE CONTENT GLIDER WIDGET
Every single content in Content Glider is coded by HTML combination. I will show you the HTML structure of per content glider.

Per Content


<div class="glidecontent">

<div class="glidim">
<a href="POST-LINK-LOCATION" title="TITLE" > <img src="IMAGE-LINK-LOCATION" style=”width:450px; height:180px" alt="IMAGE TITLE"/> </a>
</div>
<div class="glidmeta">

<h2><a href=" POST-LINK-LOCATION " title="TITLE">POST TITLE</a></h2>

TEASER TEXT, ...

<div class="ad2">

YOUR-ADSENSE-CODE HERE

</div>

<div class="gmore">
<a href="POST-LINK-LOCATION">Read more</a>
</div>


</div>
</div>

Please, do not change the red text eventhough it is a quote symbol.

Change the word:
  • POST-LINK-LOCATION with your featured article link address
  • IMAGE-LINK-LOCAION with your image address
  • YOUR-ADSENSE-CODE HERE with your 468x60 adsense code
  • TITLE with your short description. TITLE is hover, that will show when your mouse put over the link.
  • IMAGE TITLE with your own image title. IMAGE TITLE is hover, the title will show when your mouse put over the image.
  • POST-TITLE with your article title.

You can edit it in word processor, notepad or alike

SET YOUR ADSENSE COLOR CODE FOR CONTENT GLIDER
Go to your adsense account, then change the color with this below

Border
#
Background
#
Text
#
URL
#

save it...
Copy that code

MAKE MORE THAN ONE (RECOMMENDED MAX 12 IMAGE SLIDE)
Just copy another content below the previous. You can make it three, four, or five content glider. After that, Change all link, image source, Teaser Text, and hover short description. No need to change the adsense code. You only need to copy-paste again.

AFTER MAKE YOUR OWN CUSTOMIZATION

  1. Go to Add Page Element
  2. You'll see the Glider Widget
  3. Then Press Edit
  4. Paste your content into the HTML/javascript box
  5. Save it, then you're done (Your Adsense maybe appear for next 10 minutes)

:) have a nice try .......

EXAMPLE CODE


<div class="glidecontent">

<div class="glidim">
<a href="http://www.cahayabiru.com/2009/03/blogger-template-zinmag-monezine.html" title="Superbowl"> <img width="450" alt="Superbowl" src="http://web2feel.com/tribune/wp-content/uploads/sports.jpg" height="180"/> </a>
</div>
<div class="glidmeta">

<h2><a href="http://www.cahayabiru.com/2009/03/blogger-template-zinmag-monezine.html" title="Superbowl">Superbowl</a></h2>
Lorem ipsum dolor sit amet, consectetuer adipiscing elit. Quisque sed felis. Aliquam sit amet felis. Mauris semper, velit semper laoreet dictum, quam diam dictum urna, nec placerat elit nisl in quam. Etiam augue pede, molestie eget, rhoncus at, convallis ut, ...

<div class="ad2"> <script type="text/javascript"><!--
google_ad_client = "pub-xxxxxxxxxxxxxxxx";
google_ad_host = "pub-xxxxxxxxxxxxxxxx";
/* 468x60, created 3/15/09 */
google_ad_slot = "xxxxxxxxxx";
google_ad_width = 468;
google_ad_height = 60;
//-->
</script>
<script
src="http://pagead2.googlesyndication.com/pagead/show_ads.js" type="text/javascript">
</script>
</div> <div class="gmore">
<a href="http://www.cahayabiru.com/2009/03/blogger-template-zinmag-monezine.html">Read more</a>
</div>

</div>

</div>

<div class="glidecontent">

<div class="glidim">
<a href="http://www.cahayabiru.com/2009/03/blogger-template-zinmag-monezine.html" title="Bond with a vengeance"> <img width="450" alt="Bond with a vengeance" src="http://web2feel.com/tribune/wp-content/uploads/bond.jpg" height="180"/> </a>
</div>
<div class="glidmeta">

<h2><a href="http://www.cahayabiru.com/2009/03/blogger-template-zinmag-monezine.html" title="Bond with a vengeance">Bond with a vengeance</a></h2>
Lorem ipsum dolor sit amet, consectetuer adipiscing elit. Quisque sed felis. Aliquam sit amet felis. Mauris semper, velit semper laoreet dictum, quam diam dictum urna, nec placerat elit nisl in quam. Etiam augue pede, molestie eget, rhoncus at, convallis ut, ...

<div class="ad2"> <script type="text/javascript"><!--
google_ad_client = "pub-xxxxxxxxxxx";
google_ad_host = "pub-xxxxxxxxxx";
/* 468x60, created 3/15/09 */
google_ad_slot = "xxxxxxxxxx";
google_ad_width = 468;
google_ad_height = 60;
//-->
</script>
<script
src="http://pagead2.googlesyndication.com/pagead/show_ads.js" type="text/javascript">
</script>
</div> <div class="gmore">
<a href="http://www.cahayabiru.com/2009/03/blogger-template-zinmag-monezine.html">Read more</a>
</div>


</div>


</div>

<div class="glidecontent">

<div class="glidim">
<a href="http://www.cahayabiru.com/2009/03/blogger-template-zinmag-monezine.html" title="Speed race"> <img width="450" alt="Speed race" src="http://web2feel.com/images/a7.jpg" height="180"/> </a>
</div>
<div class="glidmeta">

<h2><a href="http://www.cahayabiru.com/2009/03/blogger-template-zinmag-monezine.html" title="Speed race">Speed race</a></h2>
Lorem ipsum dolor sit amet, consectetuer adipiscing elit. Quisque sed felis. Aliquam sit amet felis. Mauris semper, velit semper laoreet dictum, quam diam dictum urna, nec placerat elit nisl in quam. Etiam augue pede, molestie eget, rhoncus ...


<div class="ad2"> <script type="text/javascript"><!--
google_ad_client = "pub-xxxxxxxxxxxxxxx";
google_ad_host = "pub-xxxxxxxxxxxxxxxx";
/* 468x60, created 3/15/09 */
google_ad_slot = "xxxxxxxxxxx";
google_ad_width = 468;
google_ad_height = 60;
//-->
</script>
<script
src="http://pagead2.googlesyndication.com/pagead/show_ads.js" type="text/javascript">
</script>
</div> <div class="gmore">
<a href="http://www.cahayabiru.com/2009/03/blogger-template-zinmag-monezine.html">Read more</a>
</div>

</div>
</div>

Scarlett Tabber Content

SCARLETT, BISMAX and MONEZINE download links are READY


Description : Scarlett tabber is a menu with tab navigation, It is exactly below the post list in right column sidebar. Please see the screenshot below.. Scarlett tabber consist three tab. First tab is Javascript gadget. Second tab is Tags Clouds. And the third tab is Feeds.

this picture is only example


HOW TO FILL EVERY CONTENT OF THE TABS First Tab, RECENT POST TABBER
Recent Post tab need recent-post JS. click here to save recent-post.JS

Upload that recent post JS to wherever web that facilitating web hosting for free. Or, you can save it on your own hosting.

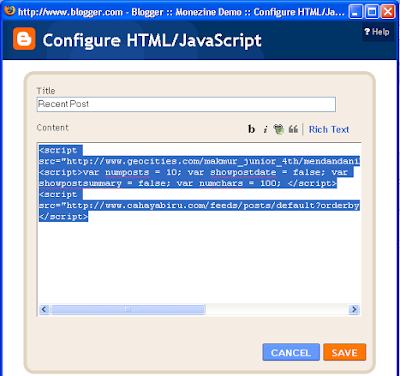
After that, please Copy this HTML structure below:


<script src='YOUR-RECENT-POST-JS-HOSTING'></script>
<script>var numposts = 10; var showpostdate = false; var showpostsummary = false; var numchars = 100; </script>
<script src='http://YOUR-BLOG-ADDRESS/feeds/posts/default?orderby=published&alt=json-in-script&callback=rp'>
</script>


Change the word :
YOUR-RECENT-POST-JS-HOSTING with your own hosting address where you upload the recent post JS. Example: http://mendandaniblog.googlepages.com/recent-post.js/

YOUR-BLOG-ADDRESS with your blog address. (Example: www.cahayabiru.com or www.cahayabiru-sphere.blogspot.com)

You could edit this in notepad or wordprocessor.

AFTER MAKING CUSTOMIZATION
  1. Go to Layout – Add Page Element
  2. you will see recent post tab navigation
  3. press edit

  4. Copy-paste your changing into te box, (the title recent post in title form, is only show in page element, not in web)
  5. Save
Second Tab, TAGS CLOUD. (NO CHANGE NEED IT)

Third Tab, VIDEO
Video Widget need video code. You could get the code from youtube.com or alike.
Change the size to 325px width and 270 px height.
After that, copy that code into the HTML/Javascript box. Then Save it.

EXAMPLE CODE :


<object width="325" height="270"><param name="allowfullscreen" value="true" /><param name="allowscriptaccess" value="always" /><param name="movie" value="http://vimeo.com/moogaloop.swf?clip_id=2079810&server=vimeo.com&show_title=1&show_byline=1&show_portrait=0&color=&fullscreen=1" /><embed src="http://vimeo.com/moogaloop.swf?clip_id=2079810&server=vimeo.com&show_title=1&show_byline=1&show_portrait=0&color=&fullscreen=1" type="application/x-shockwave-flash" allowfullscreen="true" allowscriptaccess="always" width="325" height="270"></embed></object>

Monezine Tabber

SCARLETT, BISMAX and MONEZINE download links are READY


Description :
Monezine tabber is a menu with tab navigation, It is exactly below big banner in right column. Please see the screenshot below.. Monezine tabber consist three tab. First tab is Recent-Post which use Javascript gadget. Second tab is BlogArchive. And the third tab is Label Category.
I have set the tabber with that setting and hope you like it.


RECENT POST TABBER
About that tabber, 2/3 of it is set automatically, but the 1/3 is not, i.e. the recent-post gadget. You have to fill it with this recent-post.js. click here to save recent-post.JS

Upload that recent post JS to wherever web that facilitating web hosting for free. Or, you can save it on your own hosting.

After that, please Copy this HTML structure below:


<script src='YOUR-RECENT-POST-JS-HOSTING'></script>
<script>var numposts = 10; var showpostdate = false; var showpostsummary = false; var numchars = 100; </script>
<script src='http://YOUR-BLOG-ADDRESS/feeds/posts/default?orderby=published&alt=json-in-script&callback=rp'>
</script>


Change the word :
YOUR-RECENT-POST-JS-HOSTING with your own hosting address where you upload the recent post JS. Example: http://mendandaniblog.googlepages.com/recent-post.js/

YOUR-BLOG-ADDRESS with your blog address. (Example: www.cahayabiru.com or www.cahayabiru-sphere.blogspot.com)

You could edit this in notepad or wordprocessor.

AFTER MAKING CUSTOMIZATION
  1. Go to Layout – Add Page Element
  2. you will see recent post tab navigation
  3. press edit
  4. Copy-paste your changing into te box, (the title recent post in title form, is only show in page element, not in web)
  5. Save it
That's all

Epsilon Slider

SCARLETT, BISMAX and MONEZINE download links are READY


DESCRIPTION

Slider with Teaser Text is a link with thumbnails picture and short text as teaser. In this EPSILON Blogger Template, the size of image thumbnails is 280px width and 150px height, the position is below Category Menu or above main post.


HOW TO FILL THE SLIDER WIDGET
Every single image in slide area is coded by HTML combination. I will show you the structure of that combination.

Below, This is the strucutre of PER CONTENT of epsilon image slide:


<div class="panel"> <h2><a href="POST-ADDRESS-HERE" title="HOVER-TITLE">POST TITLE </a></h2>
<p>TEASER TEXT [...]</p> <img src="IMAGE-SOURCE-ADDRESS-HERE" style='width:280px; height:150px;' alt=""/> </div>


Please, do not change the values of image width and height . Also, do not change the red text eventhough it is quote symbol.

Change the word :
  • POST-ADDRESS-HERE with your post link location
  • POST TITLE with your own title
  • POST-ADDRESS-HERE with your post link address in your blog.
  • IMAGE-SOURCE-ADDRESS-HERE with your image source address.
  • HOVER TITLE with your short description. HOVER TITLE is hover text that showed when your mouse is put over the title. You can set it "Link to …title... " or anything.

You can edit this in word processor, notepad, or alike.

MAKE MORE THAN ONE IMAGE SLIDE (RECOMMENDED MAX 12 IMAGE SLIDE)
Just copy another content below the previous. You can make it three, four, or five image slide show. After that, Change all link, image source, and hover short description.

AFTER MAKE YOUR OWN CUSTOMIZATION

After changing all words with your post link, source, and hover description; please read the following steps :

  1. Copy your changing.
  2. Go to Blogger ADD PAGE ELEMENT
  3. You’ll see Slider Gadget
  4. then, press edit
  5. after that, Paste your code into the box
  6. Save it

EXAMPLE (YOU CAN COPY AND TRY ) :


<div class="panel"> <h2><a href="" title=" Link to SUN">SUN</a></h2> <p>Lorem ipsum dolor sit amet, consectetuer adipiscing elit. In tellus nisl, tincidunt vel, tincidunt vel, gravida ac, odio. Praesent condimentum, quam at aliquet consectetuer, arcu augue condimentum turpis, ut accumsan augue lacus nec felis. Sed volutpat euismod nisl. Cras vel massa. [...]</p> <img src="http://4.bp.blogspot.com/_xfdD6S9fOk4/SdpuAr2JThI/AAAAAAAAAqM/MwIh5Xqlpzs/s1600/ZZGAMBAR01_Sun.jpg" style='width:280px; height:150px;' alt=""/> </div>

<div class="panel"> <h2><a href="" title="Link to Mercury">Mercury</a></h2> <p>Lorem ipsum dolor sit amet, consectetuer adipiscing elit. In tellus nisl, tincidunt vel, tincidunt vel, gravida ac, odio. Praesent condimentum, quam at aliquet consectetuer, arcu augue condimentum turpis, ut accumsan augue lacus nec felis. Sed volutpat euismod nisl. Cras vel massa. [...]</p> <img src="http://2.bp.blogspot.com/_xfdD6S9fOk4/SdpuAk8bCyI/AAAAAAAAAqU/SO8OJ48miGg/s1600/ZZGAMBAR02_Mercury.jpg" style='width:280px; height:150px;' alt=""/> </div>

<div class="panel"> <h2><a href="" title="Link to EARTH">Earth</a></h2> <p>Lorem ipsum dolor sit amet, consectetuer adipiscing elit. In tellus nisl, tincidunt vel, tincidunt vel, gravida ac, odio. Praesent condimentum, quam at aliquet consectetuer, arcu augue condimentum turpis, ut accumsan augue lacus nec felis. Sed volutpat euismod nisl. Cras vel massa. [...]</p> <img src="http://1.bp.blogspot.com/_xfdD6S9fOk4/SdpuA3WtKRI/AAAAAAAAAqk/gUi_-Q88Fqc/s1600/ZZGAMBAR04_Earth.jpg" style='width:280px; height:150px;' alt=""/> </div>

<div class="panel"> <h2><a href="http://www.cahayabiru.com" title="VENUS">Venus</a></h2> <p>Lorem ipsum dolor sit amet, consectetuer adipiscing elit. In tellus nisl, tincidunt vel, tincidunt vel, gravida ac, odio. Praesent condimentum, quam at aliquet consectetuer, arcu augue condimentum turpis, ut accumsan augue lacus nec felis. Sed volutpat euismod nisl. Cras vel massa. [...]</p> <img src="http://4.bp.blogspot.com/_xfdD6S9fOk4/SdpuAl7FCsI/AAAAAAAAAqc/wQUqM3qmctU/s1600/ZZGAMBAR03_Venus.jpg" style='width:280px; height:150px;' alt=""/> </div>


<div class="panel"> <h2><a href="" title="HOVER-POST-TITLE">Moon</a></h2> <p>Lorem ipsum dolor sit amet, consectetuer adipiscing elit. In tellus nisl, tincidunt vel, tincidunt vel, gravida ac, odio. Praesent condimentum, quam at aliquet consectetuer, arcu augue condimentum turpis, ut accumsan augue lacus nec felis. Sed volutpat euismod nisl. Cras vel massa. [...]</p> <img src="http://2.bp.blogspot.com/_xfdD6S9fOk4/SdpuA5BqVWI/AAAAAAAAAqs/njBtRLffEhI/s1600/ZZGAMBAR05_Moon.jpg" style='width:280px; height:150px;' alt=""/> </div>

<div class="panel"> <h2><a href="" title="HOVER-POST-TITLE">Mars</a></h2> <p>Lorem ipsum dolor sit amet, consectetuer adipiscing elit. In tellus nisl, tincidunt vel, tincidunt vel, gravida ac, odio. Praesent condimentum, quam at aliquet consectetuer, arcu augue condimentum turpis, ut accumsan augue lacus nec felis. Sed volutpat euismod nisl. Cras vel massa. [...]</p> <img src="http://2.bp.blogspot.com/_xfdD6S9fOk4/SdpuFUlQx3I/AAAAAAAAAq0/P2Bio0lpiE4/s1600/ZZGAMBAR06_Mars.jpg" style='width:280px; height:150px;' alt=""/> </div>

Blog Archive

Free Blogger Template Cahaya Biru

Followers

Search This Blog