Monezine Tabber

SCARLETT, BISMAX and MONEZINE download links are READY


Description :
Monezine tabber is a menu with tab navigation, It is exactly below big banner in right column. Please see the screenshot below.. Monezine tabber consist three tab. First tab is Recent-Post which use Javascript gadget. Second tab is BlogArchive. And the third tab is Label Category.
I have set the tabber with that setting and hope you like it.


RECENT POST TABBER
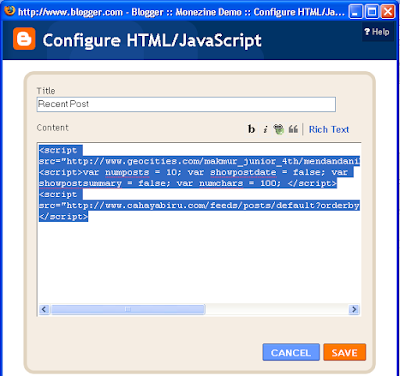
About that tabber, 2/3 of it is set automatically, but the 1/3 is not, i.e. the recent-post gadget. You have to fill it with this recent-post.js. click here to save recent-post.JS

Upload that recent post JS to wherever web that facilitating web hosting for free. Or, you can save it on your own hosting.

After that, please Copy this HTML structure below:


<script src='YOUR-RECENT-POST-JS-HOSTING'></script>
<script>var numposts = 10; var showpostdate = false; var showpostsummary = false; var numchars = 100; </script>
<script src='http://YOUR-BLOG-ADDRESS/feeds/posts/default?orderby=published&alt=json-in-script&callback=rp'>
</script>


Change the word :
YOUR-RECENT-POST-JS-HOSTING with your own hosting address where you upload the recent post JS. Example: http://mendandaniblog.googlepages.com/recent-post.js/

YOUR-BLOG-ADDRESS with your blog address. (Example: www.cahayabiru.com or www.cahayabiru-sphere.blogspot.com)

You could edit this in notepad or wordprocessor.

AFTER MAKING CUSTOMIZATION
  1. Go to Layout – Add Page Element
  2. you will see recent post tab navigation
  3. press edit
  4. Copy-paste your changing into te box, (the title recent post in title form, is only show in page element, not in web)
  5. Save it
That's all

Epsilon Slider

SCARLETT, BISMAX and MONEZINE download links are READY


DESCRIPTION

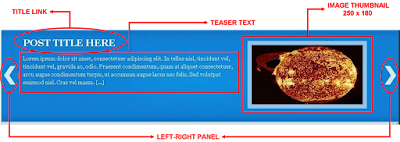
Slider with Teaser Text is a link with thumbnails picture and short text as teaser. In this EPSILON Blogger Template, the size of image thumbnails is 280px width and 150px height, the position is below Category Menu or above main post.


HOW TO FILL THE SLIDER WIDGET
Every single image in slide area is coded by HTML combination. I will show you the structure of that combination.

Below, This is the strucutre of PER CONTENT of epsilon image slide:


<div class="panel"> <h2><a href="POST-ADDRESS-HERE" title="HOVER-TITLE">POST TITLE </a></h2>
<p>TEASER TEXT [...]</p> <img src="IMAGE-SOURCE-ADDRESS-HERE" style='width:280px; height:150px;' alt=""/> </div>


Please, do not change the values of image width and height . Also, do not change the red text eventhough it is quote symbol.

Change the word :
  • POST-ADDRESS-HERE with your post link location
  • POST TITLE with your own title
  • POST-ADDRESS-HERE with your post link address in your blog.
  • IMAGE-SOURCE-ADDRESS-HERE with your image source address.
  • HOVER TITLE with your short description. HOVER TITLE is hover text that showed when your mouse is put over the title. You can set it "Link to …title... " or anything.

You can edit this in word processor, notepad, or alike.

MAKE MORE THAN ONE IMAGE SLIDE (RECOMMENDED MAX 12 IMAGE SLIDE)
Just copy another content below the previous. You can make it three, four, or five image slide show. After that, Change all link, image source, and hover short description.

AFTER MAKE YOUR OWN CUSTOMIZATION

After changing all words with your post link, source, and hover description; please read the following steps :

  1. Copy your changing.
  2. Go to Blogger ADD PAGE ELEMENT
  3. You’ll see Slider Gadget
  4. then, press edit
  5. after that, Paste your code into the box
  6. Save it

EXAMPLE (YOU CAN COPY AND TRY ) :


<div class="panel"> <h2><a href="" title=" Link to SUN">SUN</a></h2> <p>Lorem ipsum dolor sit amet, consectetuer adipiscing elit. In tellus nisl, tincidunt vel, tincidunt vel, gravida ac, odio. Praesent condimentum, quam at aliquet consectetuer, arcu augue condimentum turpis, ut accumsan augue lacus nec felis. Sed volutpat euismod nisl. Cras vel massa. [...]</p> <img src="https://blogger.googleusercontent.com/img/b/R29vZ2xl/AVvXsEhvQgMSmZzB1nAEWnfCwldT9rw5PRYABhPQmV9oSlqTBQ-0RoIjmOKSuhYi6z6c55RVzJRGtH1NeRBQQZ-wHoV1_6YUgbjiC5Ra3MVWFU4mu2HJ0WWcNMNj3Nvs22ERPvTwhYwJ4mdWGH4/s1600/ZZGAMBAR01_Sun.jpg" style='width:280px; height:150px;' alt=""/> </div>

<div class="panel"> <h2><a href="" title="Link to Mercury">Mercury</a></h2> <p>Lorem ipsum dolor sit amet, consectetuer adipiscing elit. In tellus nisl, tincidunt vel, tincidunt vel, gravida ac, odio. Praesent condimentum, quam at aliquet consectetuer, arcu augue condimentum turpis, ut accumsan augue lacus nec felis. Sed volutpat euismod nisl. Cras vel massa. [...]</p> <img src="https://blogger.googleusercontent.com/img/b/R29vZ2xl/AVvXsEhEd_0tFwTmhxQ7py-rZDz2SwSJTnUSXfNtgDTlGNC7EHQaISQ-f0UlZkZKY2bLFY4L133t4u1IL2VpS2M3CS-TFHJBqLoKH3M8m2kay8vaYr3J_mr7DJ78B4EPqz9zwdFtQNH8_k8BiH4/s1600/ZZGAMBAR02_Mercury.jpg" style='width:280px; height:150px;' alt=""/> </div>

<div class="panel"> <h2><a href="" title="Link to EARTH">Earth</a></h2> <p>Lorem ipsum dolor sit amet, consectetuer adipiscing elit. In tellus nisl, tincidunt vel, tincidunt vel, gravida ac, odio. Praesent condimentum, quam at aliquet consectetuer, arcu augue condimentum turpis, ut accumsan augue lacus nec felis. Sed volutpat euismod nisl. Cras vel massa. [...]</p> <img src="https://blogger.googleusercontent.com/img/b/R29vZ2xl/AVvXsEgTBanqlP-DR2XYXdeeqOMIkETWBFgryDHS58hBQ_AbFKAo9ovlDm-gqXrjaIVjaYC_688cRCqGLi-EJXQJePUWm6rOOxgzRloZ4HnbJeSdMZc-jMicgzLms7v9jDe23cpJ163St8RO7ds/s1600/ZZGAMBAR04_Earth.jpg" style='width:280px; height:150px;' alt=""/> </div>

<div class="panel"> <h2><a href="http://www.cahayabiru.com" title="VENUS">Venus</a></h2> <p>Lorem ipsum dolor sit amet, consectetuer adipiscing elit. In tellus nisl, tincidunt vel, tincidunt vel, gravida ac, odio. Praesent condimentum, quam at aliquet consectetuer, arcu augue condimentum turpis, ut accumsan augue lacus nec felis. Sed volutpat euismod nisl. Cras vel massa. [...]</p> <img src="https://blogger.googleusercontent.com/img/b/R29vZ2xl/AVvXsEjE64HkKnn8_oVcEpTr3GV2jApkMQR4etF5TFiyU39xU1o13NSyAByURo3f9oPkLumIaoU_zm9tV8FiAgnR1kK_PXUE8udgVFoXhcCLK4z0axQi2A_MJXFwZyKzqY3Ou76Be4daMg9rn6U/s1600/ZZGAMBAR03_Venus.jpg" style='width:280px; height:150px;' alt=""/> </div>


<div class="panel"> <h2><a href="" title="HOVER-POST-TITLE">Moon</a></h2> <p>Lorem ipsum dolor sit amet, consectetuer adipiscing elit. In tellus nisl, tincidunt vel, tincidunt vel, gravida ac, odio. Praesent condimentum, quam at aliquet consectetuer, arcu augue condimentum turpis, ut accumsan augue lacus nec felis. Sed volutpat euismod nisl. Cras vel massa. [...]</p> <img src="https://blogger.googleusercontent.com/img/b/R29vZ2xl/AVvXsEh33d25Uo5F80xqnbUPqluMlfUeiAzVm53vFfOoXrvKwuwuHpQHtV3gaRe6HAM3yTEYTBFI6iXvROJUWkGzqg3bRkWjLD5D_64O4xjeLjt5zU7ZIyYmtJ-4NFab961fQJMf8gY6fTAlm50/s1600/ZZGAMBAR05_Moon.jpg" style='width:280px; height:150px;' alt=""/> </div>

<div class="panel"> <h2><a href="" title="HOVER-POST-TITLE">Mars</a></h2> <p>Lorem ipsum dolor sit amet, consectetuer adipiscing elit. In tellus nisl, tincidunt vel, tincidunt vel, gravida ac, odio. Praesent condimentum, quam at aliquet consectetuer, arcu augue condimentum turpis, ut accumsan augue lacus nec felis. Sed volutpat euismod nisl. Cras vel massa. [...]</p> <img src="https://blogger.googleusercontent.com/img/b/R29vZ2xl/AVvXsEjYqGB9Cxxdhyphenhyphenzg9CQWCensPmR9_yS9el9pE0pMtMNHyAFFd8wP1Be1-CoAG_FDWPU-VYDv4Gi2TN_b_9TaiWaEephSamOuwJx9fmVzFxni7N9dib2xaX01CuQpAm8H4UMRRnMZS5r8WN8/s1600/ZZGAMBAR06_Mars.jpg" style='width:280px; height:150px;' alt=""/> </div>

Scarlett Post List

This writing is explaining about how to fill in the Post list in Scarlett template.

Short Description


Description
I do not know how to describe the postlist. Maybe you could help me about it. Well, Post list position is in top right column. You can see the screenshot below... The postlist use fixed height in its CSS. it can load 4 custom post with link which turns animated up - down .


HOW TO FILL THE CONTENT IN POST LIST
Every single content in Post link is coded by HTML combination. Below, I will show you the structure of that combination. To fill the content of Post list is easy as set the menu. :)


HTML Structure


<ul class="spy">


<li>

<img style="width:100px; height:60px" alt="" src="YOUR-IMAGE-ADDRESS"/>
<h2><a href="YOUR-POST-LINK-HERE" title="TITLE">POST TITLE</a></h2>
<div class="auth"> Posted by AUTHOR</div>
</li>

</ul>


Change the words:
  • YOUR-POST-LINK-HERE with your own featured article address
  • YOUR-IMAGE-ADDRESS with your image hosted
  • TITLE with the title of your post/article. title is hover, the title will show when your mouse put over the post title link
  • POST TITLE with title of your post
  • AUTHOR with your name
You can edit this in word processor, notepad, or alike.


MAKE MORE THAN ONE
Just copy another content below the previous. You can make it three, four, or five. After that, Change all link, image source, and the title.
Please, see below :


<ul class="spy">

<img style="width:100px; height:60px" alt="" src="YOUR-IMAGE-ADDRESS"/>
<h2><a href="YOUR-POST-LINK-HERE" title="TITLE">POST TITLE</a></h2>
<div class="auth"> Posted by AUTHOR</div>
</li>


<img style="width:100px; height:60px" alt="" src="YOUR-IMAGE-ADDRESS"/>
<h2><a href="YOUR-POST-LINK-HERE" title="TITLE">POST TITLE</a></h2>
<div class="auth"> Posted by AUTHOR</div>
</li>

<-- You can add more list by copy-paste the blue text in here -->

</ul>


Please, do not delete the red texts


AFTER MAKE YOUR OWN CUSTOMIZATION
After changing all words with your post link, source, and hover description; please read the following steps :
  1. Copy your changing.
  2. Go to page element
  3. You will see postlink widget
  4. then, press edit
  5. Paste your code into the box
  6. Save it


EXAMPLE FOR POSTLIST


EXAMPLE HTML code (you could copy-paste into your widget/gadget) :


<ul class="spy">

<li><img style="width:100px; height:60px" alt="" src="http://img99.imageshack.us/img99/6771/gamezgalsym2.jpg"/> <h2><a href="http://www.cahayabiru.com/2009/02/blogger-template-gamezine-cahaya.html" title="GameZine Bloggerized"> Game Zine </a></h2>
<div class="auth"> Posted by Cahaya Biru </div> </li>
<li><img style="width:100px; height:60px" alt="" src="http://img362.imageshack.us/img362/6766/screendh2.jpg"/>
<h2><a href="www.cahayabiru.com/2009/02/blogger-template-zinmag-futura.html"> Zinmag Futura</a></h2><div class="auth"> Posted by Cahaya Biru </div> </li>
<li>
<a href="http://cahayabiru.com/2009/01/blogger-template-forex-press.html" title="Forex Press"><img style="width:100px; height:60px" alt="" src="http://img300.imageshack.us/img300/7600/forexgalmg1.jpg"/> </a> <h2><a href="http://www.cahayabiru.com/2009/01/blogger-template-forex-press.html" title="Forex Press">Forex Press </a></h2>
<div class="auth"> Posted by Cahaya Biru</div> </li>
<li>
<img style="width:100px; height:60px" alt="" src="http://img99.imageshack.us/img99/6771/gamezgalsym2.jpg"/>
<h2><a href="http://cahayabiru-sphere.blogspot.com/2009/02/blogger-template-gamezine-cahaya.html" title="GameZine Bloggerized"> Game Zine </a></h2> <div class="auth"> Posted by Cahaya Biru </div> </li>

</ul>


Have a nice try .........

Scarlett Image Slider

This writing is explaining about how to fill the content of Image Slider Of Scarlett Template.

Short Description


Image slide is a link with thumbnails picture. In this SCARLETT Template, the size of image thumbnails is 200px width and 100px height, the position is below Category Menu or above main post.


HOW TO FILL THE CONTENT IN SLIDER WIDGET
Every single image in slide area is coded by HTML combination. Below, I will show you the structure of that combination.


HTML Structure


<div class="panel">

<a href="ARTICLE-LINK-HERE"
rel="bookmark" title="Link to HOVER-TITLE"><img style="width
height:100px" src="IMAGE-SOURCE-ADDRESS-HERE"
alt=""/></a>

<h2><a href="ARTICLE-LINK-HERE"
rel="bookmark" title="Link to HOVER TITLE">ARTICLE-
TITLE</a></h2>

</div>

Please, Change the word :
  • ARTICLE-LINK-HERE with your article link address in your blog. This link will be directed to your post.
  • IMAGE-SOURCE-ADDRESS-HERE with your image source address.
  • HOVER TITLE with your short description. Hover is some texts or short description that showed when your mouse is put over the title.
  • ARTICLE- TITLEwith the title of your article/post title
You can edit this in word processor, notepad, or alike.


MAKE MORE THAN ONE (RECOMMENDED MAX 12 IMAGE SLIDE)
To make another content of the Slider, copy-paste another content below the previous. You can make it three, four, or five image slide show. After that, Change all link, image source, and hover short description as explained above.
Ok. Have a nice blogging.


After Make Customization


After changing all words with your post link, source, and hover description; please read the following steps :
  1. Copy your changing.
  2. Go to page element
  3. You’ll see Slider Gadget
  4. then, press edit
  5. Paste your code into the box
  6. Save it

Now, you have images that will be showed in web.


Example Model For Slide Show


<div class="panel">
<img style="width:200px; height:100px" src=" https://blogger.googleusercontent.com/img/b/R29vZ2xl/AVvXsEhvQgMSmZzB1nAEWnfCwldT9rw5PRYABhPQmV9oSlqTBQ-0RoIjmOKSuhYi6z6c55RVzJRGtH1NeRBQQZ-wHoV1_6YUgbjiC5Ra3MVWFU4mu2HJ0WWcNMNj3Nvs22ERPvTwhYwJ4mdWGH4/s1600/ZZGAMBAR01_Sun.jpg" alt=""/>
<h2><a href="http://www.cahayabiru.com/" rel="bookmark" title="Link to SUN">SUN </a></h2>
</div>

<div class="panel">
<img style="width:200px; height:100px" src="https://blogger.googleusercontent.com/img/b/R29vZ2xl/AVvXsEhEd_0tFwTmhxQ7py-rZDz2SwSJTnUSXfNtgDTlGNC7EHQaISQ-f0UlZkZKY2bLFY4L133t4u1IL2VpS2M3CS-TFHJBqLoKH3M8m2kay8vaYr3J_mr7DJ78B4EPqz9zwdFtQNH8_k8BiH4/s1600/ZZGAMBAR02_Mercury.jpg" alt=""/>
<h2><a href="http://www.cahayabiru.com/" rel="bookmark" title="Link to MERCURY"> MERCURY </a></h2>
</div>

<div class="panel">
<img style="width:200px; height:100px" src=" https://blogger.googleusercontent.com/img/b/R29vZ2xl/AVvXsEjE64HkKnn8_oVcEpTr3GV2jApkMQR4etF5TFiyU39xU1o13NSyAByURo3f9oPkLumIaoU_zm9tV8FiAgnR1kK_PXUE8udgVFoXhcCLK4z0axQi2A_MJXFwZyKzqY3Ou76Be4daMg9rn6U/s1600/ZZGAMBAR03_Venus.jpg" alt=""/>
<h2><a href="http://www.cahayabiru.com/" rel="bookmark" title="Link to VENUS"> VENUS </a></h2>
</div>

<div class="panel">
<img style="width:200px; height:100px" src=" https://blogger.googleusercontent.com/img/b/R29vZ2xl/AVvXsEgTBanqlP-DR2XYXdeeqOMIkETWBFgryDHS58hBQ_AbFKAo9ovlDm-gqXrjaIVjaYC_688cRCqGLi-EJXQJePUWm6rOOxgzRloZ4HnbJeSdMZc-jMicgzLms7v9jDe23cpJ163St8RO7ds/s1600/ZZGAMBAR04_Earth.jpg" alt=""/>
<h2><a href="http://www.cahayabiru.com/" rel="bookmark" title="Link to EARTH"> EARTH </a></h2>
</div>

<div class="panel">
<img style="width:200px; height:100px" src=" https://blogger.googleusercontent.com/img/b/R29vZ2xl/AVvXsEh33d25Uo5F80xqnbUPqluMlfUeiAzVm53vFfOoXrvKwuwuHpQHtV3gaRe6HAM3yTEYTBFI6iXvROJUWkGzqg3bRkWjLD5D_64O4xjeLjt5zU7ZIyYmtJ-4NFab961fQJMf8gY6fTAlm50/s1600/ZZGAMBAR05_Moon.jpg" alt=""/>
<h2><a href="http://www.cahayabiru.com/" rel="bookmark" title="Link to MOON">MOON</a></h2>
</div>

<div class="panel">
<img style="width:200px; height:100px" src=" https://blogger.googleusercontent.com/img/b/R29vZ2xl/AVvXsEjYqGB9Cxxdhyphenhyphenzg9CQWCensPmR9_yS9el9pE0pMtMNHyAFFd8wP1Be1-CoAG_FDWPU-VYDv4Gi2TN_b_9TaiWaEephSamOuwJx9fmVzFxni7N9dib2xaX01CuQpAm8H4UMRRnMZS5r8WN8/s1600/ZZGAMBAR06_Mars.jpg" alt=""/>
<h2><a href="http://www.cahayabiru.com/" rel="bookmark" title="Link to MARS">MARS </a></h2>
</div>


Black Out... Script Blocked

I know this problem will come. Actually, that problem is not by me. But from the Jinsona Design itself. Jinsona want to maintain his bandwidth and it is excusable. Consequently, all template that I have converted which use Jinsona script is all blocked. Luckly, it is just the script, but not the image.

Eventhough the script could be viewed by your browser, you could not use it in your blog. To solve that problems, I give you my free hosting which use geocities.com.


GENERAL GUIDANCE TO UPLOAD javascript Files

First of all you need to find a web that facilitating javascript hosting. After that upload the template JS files. Below is the structure of using javascript third party in blogger.

HTML of the Script:
<script type="text/javascript" src="YOUR-HOSTING-JS-FILES-ADDRESS"></script>

Example:<script src='http://daru.kurniawan.googlepages.com/SCARLETThoverIntent.js' type='text/javascript'/>


Change the word :
YOUR-HOSTING-JS-FILES with your Javascript Location.
You could edit this in word processor, notepad or alike.

example: http://daru.kurniawan.googlepages.com/SCARLETThoverIntent.js

AFTER REPLACING THE ADDRESS
Go to LAYOUT -- Edit HTML -- no need to expand widget tempate.

find this:
]]></b:skin>

Below that code you will see JS script files.

Replace all the codes .


Example :
REPLACE THIS

<script type="text/javascript" src="http://web2feel.com/gamezine/wp-content/themes/gamezinealpha/js/jquery-1.2.6.min.js"></script>
<script type="text/javascript" src="http://web2feel.com/gamezine/wp-content/themes/gamezinealpha/js/superfish.js"></script>
<script type="text/javascript" src="http://web2feel.com/gamezine/wp-content/themes/gamezinealpha/js/hoverIntent.js"></script>
<script type="text/javascript" src="http://web2feel.com/gamezine/wp-content/themes/gamezinealpha/js/glide.js"></script>
<script type="text/javascript" src="http://web2feel.com/gamezine/wp-content/themes/gamezinealpha/js/slider.js"></script>
<script type="text/javascript" src="http://web2feel.com/gamezine/wp-content/themes/gamezinealpha/js/hover.js"></script>
<script type="text/javascript" src="http://web2feel.com/gamezine/wp-content/themes/gamezinealpha/js/jquery-ui-personalized-1.5.2.packed.js"></script>
<script type="text/javascript" src="http://web2feel.com/gamezine/wp-content/themes/gamezinealpha/js/sprinkle.js"></script>

WITH :
<script type="text/javascript" src="YOUR-JS-ADDRESS"></script>


FOR GAMEZINE BLOGGER TEMPLATE

SORRY, MY GEOCITIES, Data transfer limit exceeded

Please Download this GAMEZINE JS Files and Upload it
Click Here (DOWNLOAD)
after download, read guide about how to install javascript third party

FOR FUTURA BLOGGER TEMPLATE
JAVASCRIPT HOST.COM SERVER HAS BEEN CLOSED BY ITS ADMINISTRATOR
Please Download this FUTURA JS Files and Upload it

FOR REDUX BLOGGER TEMPLATE
JAVASCRIPT HOST.COM SERVER HAS BEEN CLOSED BY ITS ADMINISTRATOR
Please Download this REDUX JS Files and Upload it

FOR PRIMUS BLOGGER TEMPLATE
We have included the files... you need to upload it

FOR FOREX PRESS BLOGGER TEMPLATE
I have included the files in package..... you need to upload it.

Androida (Demo Only)


This day, I would like to introduce Blogger Template Androida, from WP Themes Androida, and designed by Jinsona Design. I will quote short description from its designer.
Androida is a business template based on wordpress. It is based on Android phone niche. The theme also comes with an optional blog layout. Users are given the option to choose between business template layout and regular blog template layout. Theme is powered with featured content glider, featured posts, featured video, banner ads, widgetized sidebars, feedburner subscription form etc. (quoted from web2feel.com)
Overview Androida Blogger Template

Designer : Jinsona Design
URL : web2feel.com
Date Released : 29 January 2009

Converter : Cahaya Biru
URL : www.cahayabiru.com (This Blog)
Date : 17 March 2009

Features Of Androida
  1. Content Glider
  2. Triple Inline Minipost (In homepage and category Page)
  3. Feed Burner Form
  4. Search Form (in article page)
  5. banner ads
  6. Auto Readmore

Androida has two layout mainpost, home and category page with 1000px width; and the single page is 625px width. In the homepage, the sidebar is hidden. the sidebar or the right column is only seen in the single page. You can see the screenshot below. Or, you can see the live demo at the end of this article.

Home Page Or Category Page

Article Page


Add Element Page

Blogger system page element is only showing the homepage only... For that reason the sidebar or right column is hidden. However, we still find the way to solve this problem with adding BlogLayout.

Why I do not share it publicly...??
Androida setting is not regular as Blogger Template. Because of that, when androida converted to blogger template, based on original design, something will hidden in add page element.


Where is the sidebar??? All width is dominated by mainpost

I know, this setting is hard to use for newbie or someone with middle level knowledge of blogger xml gadget. They will not see any sidebar gadget in add page element. Consequently, they have to add their widget in LAYOUT -- edit HTML--expand widget. In my mind, it is not good at all, newbie will suffer with this.

Parallel with it, one of the general principles that must hold by template converter or XML template maker is that their work can be used as easy as possible. In one hand, template maker have to assume that his works is for newbie, not for computer analyst. Template maker have to avoid difficulty, hard, or alike.

Androida, eventhough it is 100% widgetized, It is still too complicated to share publicly.

Zinmag Monezine

Monezine Blogger Template Overview :

Description: Originally From WP Themes Monezine
Designer : Jinsona Design
Url : web2feel.com
Date : December 20, 2008

Converter : Cahaya Biru
Url : www.cahayabiru.com
Date : March 15, 2009

The list of features include
1.Premium theme layout.
2. Multi-level drop-down javascript navigation menu.
3. Featured post section with javascript gallery
4. Site wide customizable 125 x 125 banner ads.
5. Site wide customizable 300 x 250 banner ad.
6. Site wide customizable 600 x 90 banner ad.
7. Adsense enabled
8. Custom Login field and mini admin panel
9 .About me section, which is customizable, including image and text.
10. Post thumbnails
11.Tabbed content area .
12. Widgetized, dual sidebar.
(adapted from web2feel.com)


figure of Monezine Blogger Template


Monezine Guide :
1. Changing Header Logo
The Monezine Header Logo Size is 195x44 px. To change the image with your own logo, please follow this steps below.
  • Go to LAYOUT -- Edit HTML -- no need expand Widget
  • Find this image location:

https://blogger.googleusercontent.com/img/b/R29vZ2xl/AVvXsEgg4fhsbOJEShBFUZDvCbsOqrqCXwLqBz_6_gwfbL4JpwFIsL9InFeVgwho5rBhyI8VnHyHDrWUJ-1ZIRZNyfd5XpB4Ih34rnh7Q_2YhoPiseY3VIOsHDZykLpTdTbGOpOhJpFy-bWLj0U/s1600/logo.jpg

  • After that, change it with your own image location.

2. Change the Tab Navigation Title
  • Go to LAYOUT -- Edit HTML -- no need expand Widget
  • Find this code:

<li class='pop'><a href='#popular'> RECENT</a></li>


  • Below that code you will see like this:

<li class='pop'><a href='#popular'> RECENT</a></li>
<li class='fea'><a href='#archive'> ARCHIVE </a></li>
<li class='rec'><a href=' #recent'> LABEL </a></li>


  • please change the words RECENT, ARCHIVE, and LABEL with your own words.
  • Save Your Template


3. Content Glider (Click Here)
4. Fox and Cat menu (Click Here)
5. Tabber Content (Click Here)
6. Installing Monezine Adsense Code (Click Here)


Creative Commons License
Monezine Blogger Template by Daru Kurniawan Ahmadi is licensed under a Creative Commons Attribution 3.0 United States License.
Based on a work at www.cahayabiru.com.
Permissions beyond the scope of this license may be available at http://www.cahayabiru.com/2009/03/blogger-template-zinmag-monezine.html.

Blog Archive

Free Blogger Template Cahaya Biru

Followers

Search This Blog